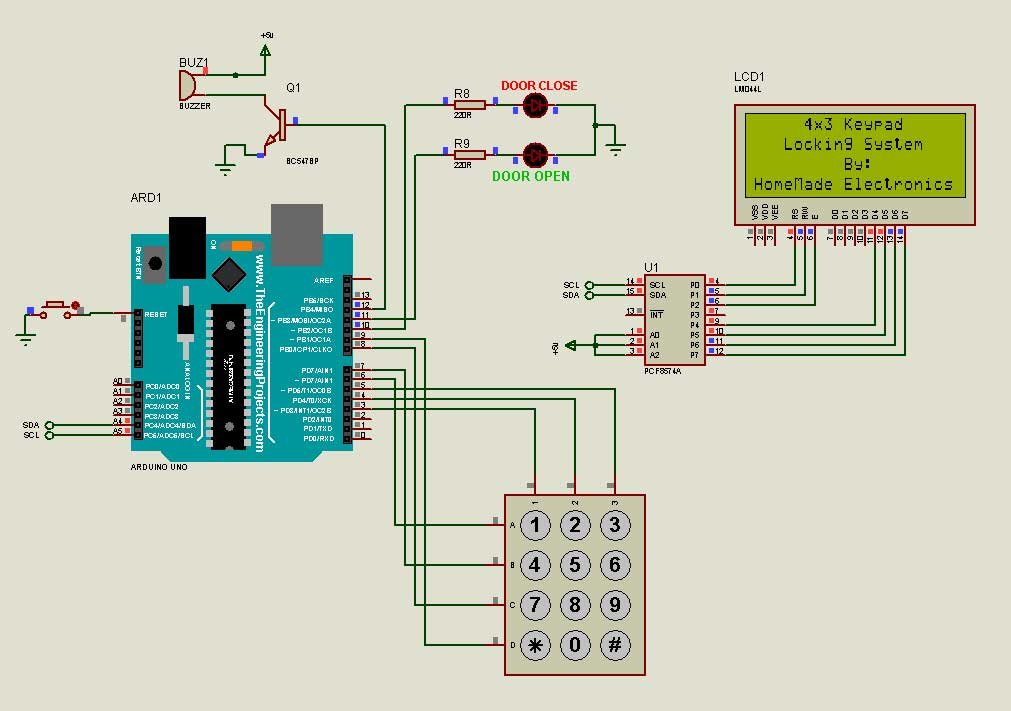
This project is about building a Proteus Pincode secure door locking using Arduino Uno, I2C LCD, and 4X3 Matrix Keypad. The user has to enter an exact pin code before granting access.
LEDs were used to represent the magnetic door latches. This means you can physically build the project and replace the LEDs with magnetic lockers/latches. The project was built and coded in two separate versions.
The first version is termed Manual Relock. With this version, when a user enters a correct pin code and the door is opened, the user has to press the ” * ” button on the keypad to return the latch to the lock state.
Also when a user enters the wrong pin code 3 consecutive times, the system enters a restriction safe mode. This means no further input is allowed until the system administrator manually resets the system.
There is also an Automatic Relock version. Unlike the Manual Relock, this version will automatically relock the door after a user has inputted a valid unlock code. Moreover, when a user enters a wrong pin code 3 consecutive times, the system enters a restriction-safe mode for a predefined period of time and automatically returns to the normal state.
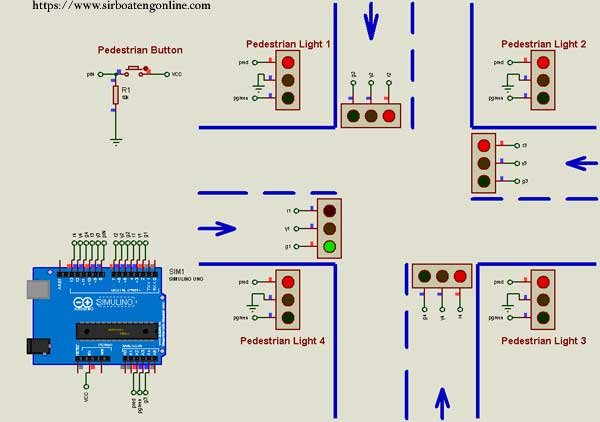
See also, a 4-way traffic system developed in Proteus.
This proteus Pincode locking system is applicable to places where security and privacy are paramount. Security and privacy are very essential yet challenging in this modern era.
An era where privacy is a concern to everyone. What if someone gets hold of the key to your locker, room, or office? It means the person can steal your precious asset, classified documents, or anything that you hold dear.
Recommended Posts:
Using a password or Pincode system is secure as compared to the traditional physical key locking system. The only drawback of the digital and electronic locking systems is their dependence on a power source.
This means in some situations where the system will be driven by the public utility supplier, the system will not work whenever there is a blackout. This issue can be however rectified by incorporating a backup source such as rechargeable batteries, solar, etc.
Building the Proteus Pincode Locking System

The circuit is very simple, just connect your hardware as shown in the diagram above and then download your preferred version of the zip file below which contains all the code and the Proteus project file. Extract the zip file and upload the hex file to the Arduino board in Proteus.
You also need Keypad and I2C LCD Libraries for Arduino. If you don’t have them already you can download them from these links.
Moreover, if this is your first time using Proteus, you may need to install the Arduino libraries for Proteus.
You can refer to the video below on how to open, upload the hex file and run the simulation.
To change the default access code, edit the area highlighted in yellow from the image below.
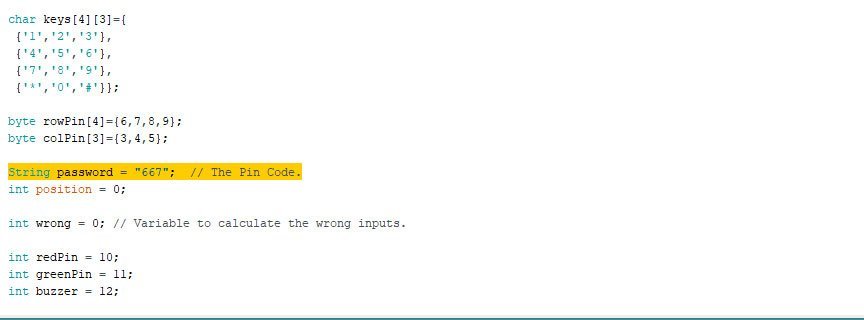
This is a 3 digits Pincode project so make sure the default Pincode is not more than 3 digits. If you need more than 3 digit Proteus Pincode project, just write it in the comment. Also if you have any project that you want me to help you design and simulate, don’t hesitate to contact me.
NB. If you need four (4) a digit password / Pin code locker, please download this project: 4 digit Pin code Proteus Locking System
Hello Sir! I have a Problem. If i am changing in the code then lcd does not show any data. What is the error produced during changing. Kindly Explain with me
What did you change in the code?
sir, i’m working on a project with 4 digit pin code. what changes will i have to do?
Add another value to: String password = “667”; // to make it 4 digits
Then Change:
1. String key[3]; to String key[4];
2. lcd.setCursor(position,2); to lcd.setCursor(position,3);
3. if(position == 3) to if(position == 4)
4. else if(position == 3 && wrong == 0) to else if(position == 4 && wrong == 0)
thanks for the reply. i’m trying. what is the result i’ll let you know
sir, there’s an error. it shows
Error compiling for board Arduino/Genuino Uno.
what i’ve to do?
sir, the compilation error of arduino code has been solved.
but i’m facing problem while adding the directory of hex file into the arduino. it’s showing the file property has not been specified.
please can you tell me what to do?
Reach me on Whatsapp +233266302607. I will like to see your set up and assist you where possible
Can you please give me the project report?
Unfortunately, this is a custom project done by myself. there is no report
Hello, can you help me?
When I run the code in arduino I get this error:’class LiquidCrystal_I2C’ has no member named ‘init’.
Thank you!
You have two options to solve this issue: to #include “LiquidCrystal_I2C.h”
1. Download this LCD library: https://github.com/bemtele/LiquidCrystal_I2C/archive/main.zip remove your old LCD library and install this.
2. Change the library header file from: #include
If you still have an issue, kindly let me know
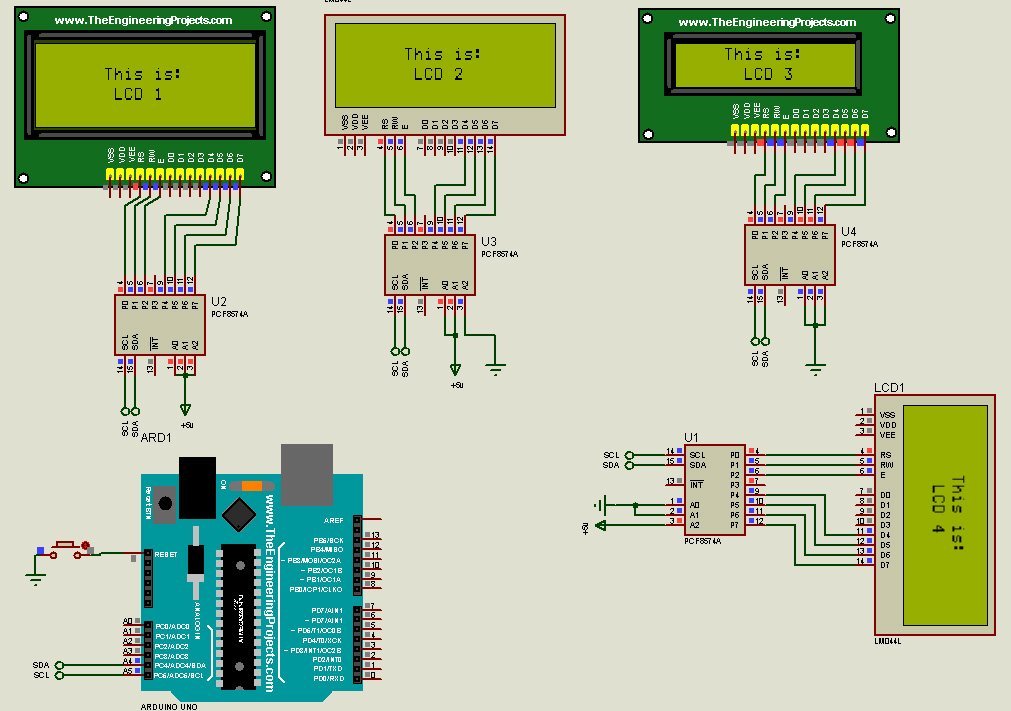
Sir i want to know why we use PCF8574 and how that IC gives command to LCD instead of arduino??
The PCF8574 is 8bit I2C expander. It is used to save pins of the Arduino because the Keypad module uses many of the Arduino pins. If you like you can connected the LCD directly to the Arduino.
whe we did not connect LCD directly to Arduino ??
Also if you are building this project with real components, you don’t need the ic because it is already embedded on the LCD i2c backpack
Thank you sir
You are welcome
sir ca you tell me how to add gsm module in this model or can you provide me complete file if possible ?
GSM module to do what?
Sir what is the function of the buzzer and the switch in the circuit?
The buzzer is to sound an alarm when someone enters the wrong code 3 times. The switch is just a reset button that reset the Arduino in case of an unsuccessful attempts.
sir why we use bcf578 transistor ??
The BCF578 transistor is not critical and can be replaced with any general-purpose NPN transistor. You can even remove the transistor and connect the buzzer directly to the Arduino.