Welcome to Sir Boateng Online! Today I will show you how to make an App using MIT App Inventor 2 and use it to control the Arduino Bluetooth locking system such as the Arduino-based door lock system using HC 05 Bluetooth and Arduino Uno.
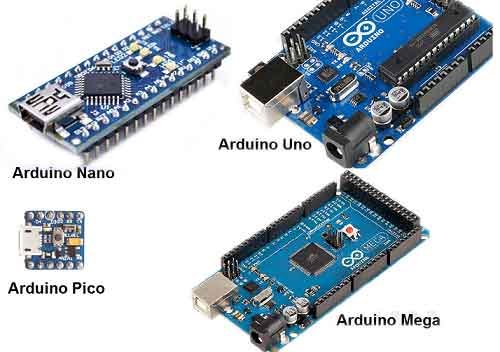
If you are unfamiliar with Arduino Uno, you can start from scratch with this previous tutorial, Arduino programming for beginners.
This project is far more secure than the traditional key-based system and electronic wireless lock system because it can generate a new password each time a user unlocks it, increasing your security level even further.
One disadvantage of using a key-based system is the possibility of your key being lost or stolen. Furthermore, an electronic wireless lock system that requires a password or passcode is not secure.
You are more likely to forget the password, and there is also a greater risk of a security breach by intruders.
Recommended Posts:
Sir Boateng Online platform is always concerned with security. That is why we created this one-of-a-kind and more secure Do-it-yourself smart locking system, which will eliminate all security threats while also providing better and more robust locking options.
In fact, you’ll also learn how to create your own Android apps with MIT App Inventor 2.
These are the materials needed for this project.
Table of Contents
List of Components
- Arduino UNO
- Bluetooth Hc05
- Light Emitting Diode (LED)
- Some Wires/Jumper Wires
- Servo Motor/ Magnetic locker
- 5V Battery/Power Bank
- USB Type B for Programming Arduino
We can begin the project (Bluetooth Locking System with Arduino and MIT App Inventor 2) once we have obtained all of the above components.)
Coding of the Arduino Bluetooth locking system
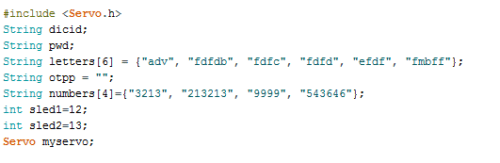
To begin building this amazing security project with an App created with an MIT App Inventor 2, connect your Arduino Uno to your computer, open the Arduino IDE, and include all of the necessary libraries as well as declare all of the variables and constants.
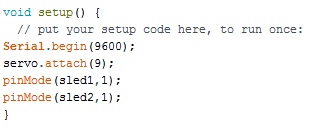
After including the servo library, an array to generate a password was created. Following that, we created a few more strings and declared the password, OTP, and monitoring LED pin numbers, as shown below.
Bluetooth serial and Baud rate settings were also set. The Baud rate was set to 9600, but you can also use the HC 05 Bluetooth module’s default Baud rate of 38400. Then, we used the servo.attach to configure a pin for the servo (PWM pin number). OUTPUT was also assigned to the monitoring LEDs.
Looping was created to validate the data from the Bluetooth module. Using the if() statement, the device id is constantly checked. If it matches, it calls the otp() function to generate OTP, as shown in Fig. 3

The check() function was also created to determine whether or not the OTP is correct. If it is correct, the servo is turned to the open position, as shown in Fig. 4 below.

The Arduino coding part is complete. Nothing can stop you now 😎 Charlie! Go Go, Let’s go to the next stage.
Yes, it’s time to Androlize our project! 😍 Let’s create an Android app so we can access the project from our phones. The app can be created using one of two platforms: Android Studio or MIT App Inventor 2. Let’s use MIT App Inventor 2 for this project because it’s simple to use and creating an App with blocks without coding is awesome.
Arduino Bluetooth Control system APP with MIT App Inventor 2
Open MIT App Inventor 2 and sign in with your Google account. Create a new project and design a layout similar to the one shown in the image (Fig. 5). It’s as simple as dragging and dropping. Alternatively, you can download and import the provided code and modify it as needed.

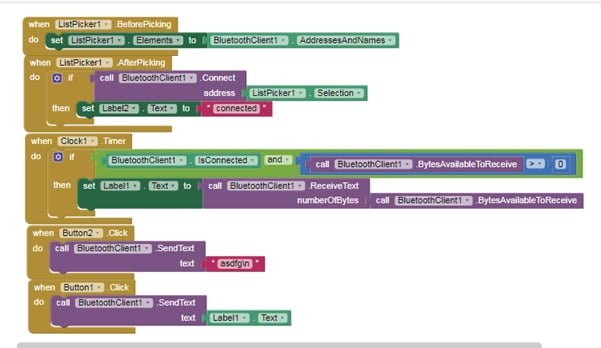
After you’ve finished designing the layout in MIT App Inventor 2, click the Blocks tab to go to the block editing page, where you can define all of the logic.
The Bluetooth list of available connections was initialized first, as seen in the block editing window. Then, according to our Arduino code, a button function is set to send the device id, as shown in the figure below.
Finally, download and install the App.apk from the MIT App Inventor 2 page on your Android phone. Congratulation! You have finished the software and coding components of your Arduino Bluetooth wireless locking system.
You can get the .apk, .aia file, and code from the link below.
Download codes
Now let’s set up the hardware by connecting the several components.
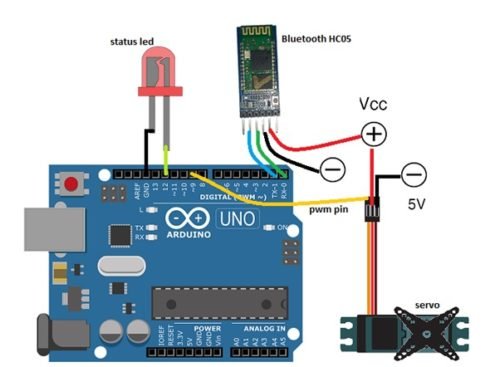
Connecting the Components of Arduino Bluetooth Locking System.
| Arduino Pins | Components and Pin |
| Arduino Pin 9(PWM) | Servo Yellow Wire (signal input wire) |
| Rx | Bluetooth Module TX |
| Tx | Bluetooth Module RX |
| GND | GND Bluetooth |
| VCC | Bluetooth VCC |
| Pin 12 | LED |
| GND | Battery(-VE) |
The complete circuit and connections are illustrated in the picture below.
Always double-check your setup to ensure that all connections are working properly. We’ve finished our fantastic project on the OTP-based Arduino Bluetooth locking system. Congratulations!
MIT App Inventor 2 Bluetooth Locking: Testing the Complete Project.
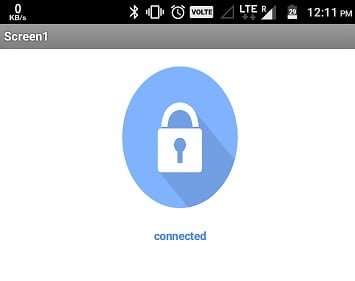
Connect the Arduino and all of its components to a power source. Open the installed App and turn on the phone’s Bluetooth. When you tap the Bluetooth icon, a list of Bluetooth connections for pairing will appear. Choose HC 05. When pairing is successful, the App will display a ‘connected’ message, as shown below.
Once the connection has been established, tap the key icon to send the device id to match. Then, tap the key again to LOCK or UNLOCK the system. The servo and Arduino’s onboard monitoring LED light up to indicate a successful LOCK or UNLOCK.
The servo was only used for demonstration purposes. You can modify the MIT App Inventor 2 App and the circuit to control any locking mechanism.
If you like this Bluetooth locking system, you may consider how to use Wi-Fi to control household appliances by diving into ESP8266, NodeMCU and Wemos for Arduino IDE.
I have personally built and tested this project. I am proud to say that it works to satisfaction. if you need help or components to build this project, Whatsapp me on +233266302607