If you are reading this post, chances are; you have come across the LoRa RYLR998 and Arduino, and you are curious to know more about them. Perhaps, you want to know how to strap it around Arduino for unique IoT projects such as smart agriculture, smart homes, innovative industries, intelligent schools, and smart cities.
Or maybe you got, or you have seen, the LoRa RYLR998 in action, and you want to learn the AT commands. Well, I can assure you that you are on the right page.
Of course, while much stuff is getting smarter, there is also an appreciably increasing number of IoT applications. Yes, Amazon Alexa, Google Assistant, Apple’s Siri, and what say you are among the many devices and software changing the game! Our social activities.
Today you can wake up and whisper to Alexa to remind you of the appointment you’ve booked at noon or if you want a Pizza at 7:30 pm, say it!
Also, if you are new to Arduino Programming, consider reading this article: Arduino Uno Programming for Beginners Part 1, or you can click here to see all the available blog posts.
Did I hear you say I have skipped off the road? You are entitled to that; let’s talk about LoRa RYLR998. LoRa modules are improving business performance and incredibly remote monitoring and control.
When it comes to smart homes, controlling and monitoring your home appliances without breaking a sweat, the LoRa series of modules interfaced with the Arduino is your surest bet.
This article will discuss how to interface and use the LoRa RYLR998 with Arduino to accept programs written in Arduino IDE. Moreover, I will design several projects with the Lora RYLR998 and Arduino Uno. After that, we will troubleshoot some common errors with the LoRa / Arduino interface and AT commands.
So now, let’s dive into the basics of LoRa Modules and how they operate.
Table of Contents
What is LoRa RYLR998 Module?
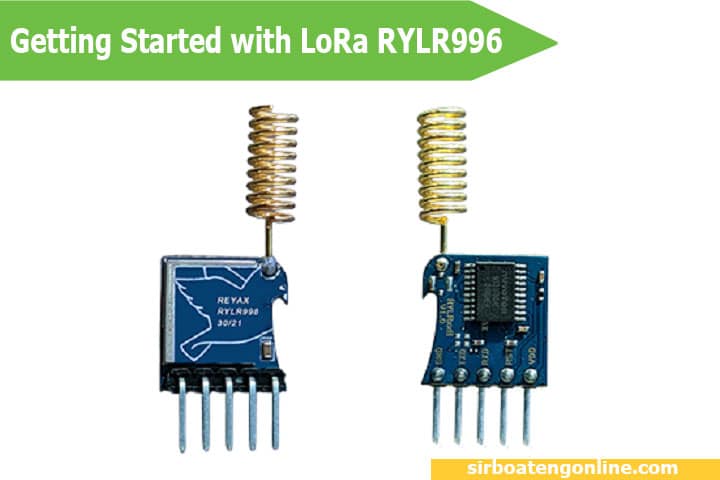
The LoRa RYLR998 transceiver module manufactured by Reyax Technology Cooperation Limited has an embedded long-range modem that gives ultra-long-range spread spectrum communication. The module also has excellent blocking immunity. Blocking immunity means the module is not easily affected by external interferences such as atmospheric conditions and other radio noise.
It has a very high sensitivity. The Reyax RYLR998 module incorporates a Smart receiving power-saving mode. It means when the device is in receiving mode, it goes into temporary sleep and waits for an incoming signal.
We can control the module easily by AT commands using serial communication. You can follow this link to download the AT command guide. The module can communicate over a long distance thanks to the built-in antenna that makes it easier to send or receive data over a long distance.
We can get the LoRa RYLR998 Module from the official website of Reyax Technology Cooperation Limited. Click on the link below to buy it:

Pinouts of LoRa RYLR998
| Pin Number | Pin Name | Description |
| 1 | Vdd | Power Supply pin (1.8V to 3.6V) |
| 2 | NRST | Active low Reset Pin |
| 3 | RXD | UART Data Input ( Also known as the receiving pin. Serial data or command is received through this pin) |
| 4 | TXD | UART Data Output ( Also known as the transmitting pin Serial data or command is transmitted to other devices or microcontrollers through this pin) |
| 5 | GND | Ground (Chasis or Vdd common pin) |
Interfacing the LoRa RYLR998 and Arduino IDE
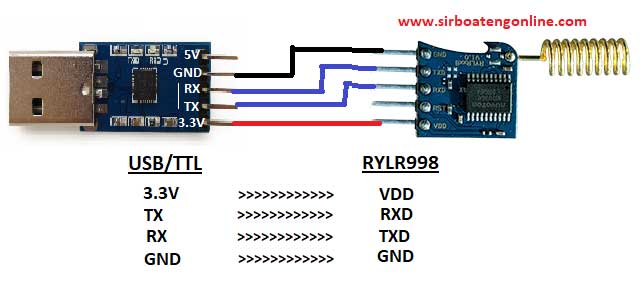
As the diagram above shows, connecting the LoRa RYLR998 wireless module to the Arduino IDE is straightforward. To make things easier, you must get the CP210x USB to UART / TTL module, the LoRa module, and the Arduino IDE.
The video below will help you to connect the LoRa Module to the Arduino IDE to send the AT commands. Please watch the video because I will also show you some common errors encountered when using the AT commands and how to solve them.
Setting Parameter for Lora RYLR998 and Arduino IDE
Suppose you have missed the video above or prefer a written tutorial. In that case, it is good to know that you must set some parameters like Address and Band before you can interface the LoRa RYLR998 module with the Arduino for incredible projects. This setup scenario makes use of the AT commands. Here are the steps:
- First, Connect the Lora module through the CP210x USB to UART / TTL module to the PC.
- In the Arduino IDE, select the PORT. To do this, go to Tool, then Port.
- After selecting the PORT, open the Serial Monitor and set the Baud rate to 115200.
- After that, you can set the parameters with some basic AT commands.
- First, type AT, then press enter key. We should get +OK in the serial monitor. (If you get an Error or nothing happened, please check the video above for possible causes and how to fix it.
- Then type AT+ADDRESS to set the address to 0 or any value you choose for the Lora module that would be used as a transmitter.
- Then type AT+NETWORKID to set the LoRa Network ID. The network ID should be unique.
- Type AT+BAND to set the frequency of the wireless band. This should follow the acceptable radio band in your country.
- Also, use AT+PARAMETER for setting the RF wireless parameters.
- If you get an error in any of the steps, please kindly watch the video above for a solution or leave a comment below this article for help.
After this introductory article, I will create fantastic IoT projects with this Wireless communication module (REYAX LoRa RYLR998). Some of these projects are:
Intelligent Irrigation system with remote monitor using LoRa RYLR998, Smart City Traffic system with emergency vehicle interrupt, Smart Agricultural with Temperature, Humidity, and Soil Moisture Monitor. Also, projects include Automatic Speed Bumps or Speed ramp detectors, Smart Home controllers and monitors, Home and Office Security Systems, Industrial Monitoring and Control, and many more.
If you are a fan of Raspberry Pi, you may consider reading this article in which I highlighted the main difference between Arduino and Raspberry Pi. It also discussed which development board is right for your next project.
In my next article, I will show you how to connect the LoRa RYLR998 to the Arduino to send and receive data or to control one Arduino from another over a long distance without WiFi or Bluetooth. Until then, stay safe, and if you have any questions or suggestions, don’t hesitate to put them in the comment section.


Wwww nikul