📢 Affiliate Links Disclosure: Some of the links on this website are affiliate links. This means that if you click on an affiliate link and make a purchase, we may receive a commission or referral fee at no extra cost to you. We only recommend products or services that we believe will add value to our readers.
You are on this page, so I will assume that you’re searching for a simple tutorial on how to create a blog. You also want to know how to make money after creating a blog. How to start a blog has been asked several times in my private email, and I think it is time to throw more light on it.
However, before we can start our blogging journey, we have to answer this frequently asked question.
What will I need to start a Blog?
There are four basic things you need to create a blog. These are:
- A web address or a domain name (this will be the address of your blog/website. For example, www.sirboatengonline.com)
- A web hosting account (this is where your blog contents are stored on the internet)
- WordPress Software (content management software that allows you to manage your blog posts easily)
- Your undying attention for 60 minutes at most.
I have carefully crafted these step-by-step instructions to show you how to start a blog in less than 60 minutes. And the good news is that you only need the most basic computer skills. Yes, you only need to know how to copy and paste into a text editor.
Believe it or not, you are a 60% blogger if you know how to construct good sentences and how to browse your way around the internet. Having social media handles such as Facebook, Twitter, TikTok, etc, is also advantageous. The best part is that you don’t have to be fluent in English before starting a blog; You can use Grammarly Premium to check your articles for grammatical errors.
This tutorial is designed for both beginners and existing bloggers. I’ll guide you through each stage with many images and short videos to help you understand everything.
Please send me a WhatsApp message or email if you have any questions or don’t understand anything, and I will try my best to assist you.
Introduction to blogging
If you already know what a blog is, kindly skip the intro and start creating your blog.
What exactly is a blog?
No problem if you aren’t familiar with that term (blog or blogging). I had no idea what it was a few years ago, either. To summarize, a blog is a website primarily focusing on published information, commonly known as blog posts.
We commonly hear about news blogs or celebrity blog sites in popular culture. Still, as you’ll discover in this article, you can establish a successful blog on almost any topic conceivable. This article you are reading is a blog post that falls under the tutorial in the Technology category.
Who is a blogger?
A blogger frequently writes and publishes articles (blog posts) from a personal standpoint. Depending on the topic, bloggers sometimes amplify people’s opinions about certain subjects like politics, policies, businesses, lifestyles, personalities, etc.
Moreover, some bloggers write articles that help them connect with their audience directly. Therefore, it is no surprise that most blogs have a “comments” area where readers may interact with the blogger. Interacting with visitors in the comments area strengthens the bond between the blogger and the reader.
Why should you become a blogger?
One of the primary advantages of having a blog is the direct connection with the reader. This link allows you to communicate and share ideas with others interested in your chosen topic (niche).
It also enables you to establish trust with your audience. Your readers’ confidence and loyalty open the door to earning money from your blog. I will explain the various ways to make money from your blog; read along.
The good news is that the internet is currently expanding, reaching billions of people everywhere. This rapid expansion means more potential viewers for your blog. One can decide to be a blogger to promote their business online.
If you sell products online, you can publish blog posts that outline how your products are used. These posts will then have a direct link to the respective products.
Now that you are familiar with the introduction to blogging let’s start your blog!
Step 1 of how to start a blog – Pick a blog name
To help you choose the name and topic of your blog, you need to answer these questions: Who are your targeted audience? What would you name your blog? What is your niche? What topic would you create your blog on?
If you have already picked a niche and an awesome name for your blog, move on to get a domain here.
It is very tricky when it comes down to choosing the right name and niche for your blog. Let’s break it down. But wait, what is a niche?
A niche is simply like a category of your blog. The niche is what area your blog will focus on. This also determines your target audience (that is, people who will visit your website and read your blog).
Picking the right niche helps you choose a blog name and build a strategy. Writing about education, travel, gaming, photography, health, lifestyle, technology, and cooking are popular blog niches.
So let’s assume you are good at making pastries; you can build your blog around cooking. As you can see that this very blog you’re reading is crafted around technology and education. That said, I have outlined a few tips below that will help you choose the right niche for your blog:
- First, choose a topic that you are passionate about. It should ideally be a subject that other people will also find interesting. Write about what you enjoy doing or the areas you want to study further.
- Your niche should attract more audience. Let’s face it; you are not writing the blog for computers but for real people. Therefore, the topic you choose should naturally interest many people. To see how people are interested in your chosen topic and whether or not people are discussing it on social media and message boards, you may use Google Trends to see how often certain phrases are searched.
- And the last tip is to have confidence in yourself. Even though it helps, you don’t have to be an expert in your chosen topic. You only have to possess an original viewpoint and your willingness to learn and unlearn. For example, you may not be an expert in cooking, but you can still write a blog on learning how to cook. And you can share with your audience all the details and improvements you have made in your cooking adventure. That is blogging.
If credibility is key to your concept (especially for blogs on politics and government policies), you may build your blog by hosting interviews with political leaders and industry players.
Step 2: Put your blog online
So you have selected an appropriate niche and decided on a name for your blog. Awesome! Now it is time to choose a domain, blog hosting (web hosting), and blog management software (CMS).
This may sound complicated, but the following steps will simplify things. And the good news is that you will get all these in a single package if you follow this tutorial to the tail. You will know everything about how to start a blog.
What is a domain name?
The domain name is what people input into their browser’s address bar to open your website. For example, sirboatengonline.com is my domain name. So to access this website, you must type sirboatengonline.com in your address bar. A domain name costs roughly between $8 and $20.
Do you have a specific domain name in mind? Use the box below to check for its availability. The results will let you know that no one has registered your domain name:
You should also note that dashes are the only permitted punctuation in domain names. You can’t use a space, either.
As a thumb-up rule, try to make your domain name easy to remember and as close as possible to your blog name.
Is your domain name already taken? Don’t worry; you can choose another. However, if you are short of ideas for picking a decent domain name, use this AI tool.
Based on your blog name, it will return a list of perfect domains while automatically excluding unavailable ones. You don’t have to buy the domain name; as I said, we will get one in a single package.
What is web hosting?
Hosting allows you to publish a website and all of its files online, allowing people to access it from everywhere. Purchasing hosting gives you access to an allocation of resources to store all of the files for your blog and delivers them to the user when they type in your blog name.
Moreover, the web hosting company also hosts the content management software (CMS) needed to manage your blogs. A CMS takes care of the technical aspect so you can concentrate on writing articles without worrying about web development.
In this article, I will show you how to use a popular CMS called WordPress. WordPress is a blogging platform that is very popular for its simplicity and ease of use. On top of that, WordPress is customizable. It has tons of themes and plugins to expand its functionalities.
So, which hosting company, should you choose? This topic needs a lot of comparisons through testing and conclusion. You can choose any hosting available, assuming it is reliable and you can afford its price. Here is a list of the 10 best hosting to consider.
But as a beginner learning how to start a blog, I recommend Hostinger International or NameCheap hosting. Why? Because once you buy the hosting package, which is relatively cheap compared to others, you will enjoy:
Free domain name. As I said earlier, you don’t have to buy a domain; Hostinger will give you one for free.
Thirty-day money-back guarantee. Within 30 days of purchase, you may request your money back if unsatisfied with their service.
Moreover, they have free, managed, and well-optimized WordPress blogging software. The good news is that their WordPress installation is automatic with just a button click.
They also provide free SSL, worth $11 to $24 a year. SSL is the padlock that is seen next to the web address in your browser. The padlock on your blog tells your readers that your website is secure.
On top of these, Hostinger has been around and doing very well since 2004; You can trust them.
Finally, they are available 24/7 via live chat to answer and assist you with any issues you may have. It can be minor problems, more technical, or you need clarification on one or two things; they got your back.
To start your blog, click the button below to buy the all-in-one packaged hosting at Hostinger.
Disclosure: Hostinger pays me some commissions when you buy the hosting package through this link. This commission keeps this website running, so I can help you and many others for free! Do not hesitate to contact me if you have trouble setting up your blog.
Follow these steps to purchase the right hosting package.
1. Click here to get the $2.99 per month rate from Hostinger. When you enter the landing page, click “Get Offer.”
2. Choose Your Web Hosting Plan. I recommend you pick the “Premium Shared Hosting,” which comes with a free domain name.
3. When the next page opens, select the hosting subscription period. I recommend you choose the more extended period, which is 48 months (i.e., four years).
4. Register an account if this is your first access to the Hostinger platform. You can quickly register with either a Facebook or Google account. Check the image below.
Finally, select the convenient payment method in your country and proceed with the purchase. Hostinger supports Credit Cards (Visa, Discover, American Express, etc.), PayPal, Google Pay, AliPay, and Coingate payment gateways.
After purchasing the hosting package, the system will redirect you to Hostinger Hpanel (the Hpanel is Hostinger’s custom control panel for managing your website). You will be asked to enter a new password to secure your account on the home page.
On the next page, click on Start Now, and under Whom you are creating the website for, choose I’m creating it for myself. Also, on the next screen, under who is creating the website? Select I’m building it myself.
You will be prompted to select the type of website you want to build; select Blog. Then, on the next screen, select No Thanks when it asks whether you need help building your website.
The system will immediately ask you to input your desired domain name. Remember, you bought a package that has a free domain name included. So select “Claim a free domain name.”
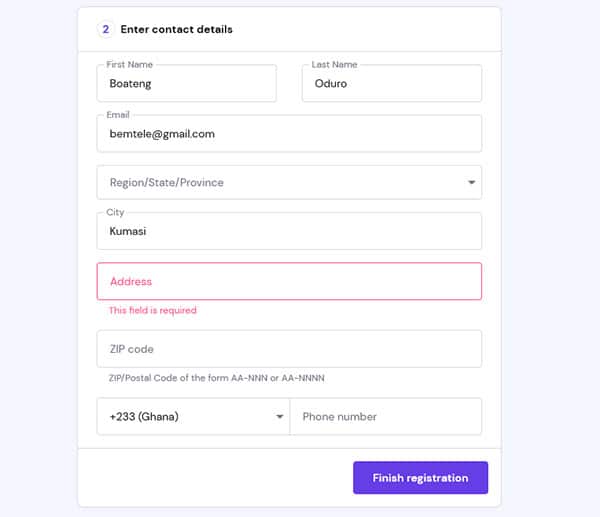
On the next screen, provide all the necessary information, such as location, business address, personal address, etc.
After filling in your details, click on “Finish Registration.” The system will then redirect you to the main dashboard. If it didn’t, click “Continue” on the next screen.
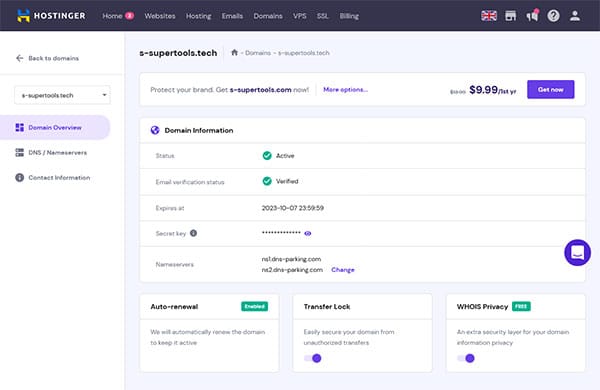
Note that registering a domain name may take about 48 hours before the domain propagates worldwide. So your domain (web address) may be inaccessible after claiming it.
After your domain has propagated worldwide, the nameservers will resolve to the Hostingers servers IP address. At this point, when you enter your domain name in a browser, it will open Hostinger’s domain parking page.

Moreover, your dashboard will display a banner that will assist you in connecting your domain to the hosting account. To connect to the hosting account, click the “Add Website” button and select your hosting account.

However, you may not see the Add website banner in some instances. If that is your case, click on hosting on the main menu and select Add Website on the next page.

Hostinger offers a walkthrough installation helper. Since you are following this tutorial, you can click “Skip, create an empty website” when prompted to add a new domain. Skipping the installation helper will take you to another page where you can select your already purchased domain.

Please select your domain on the left side and click the finish button on the next page. When you see the page below, you have successfully linked your domain to your hosting server so you can continue building your blog.

You can test your website on this page with the View Website button or Manage it with the Manage site button. First, view your new website. Ensure the website has a padlock symbol at the left of the address. If there is no padlock symbol, wait a few minutes before you continue with the next step. If the problem still exists, kindly reach me in the comment box.
Now Click Manage Site, and immediately the system will take you to the dashboard where you can manage your website’s hosting, domain, and other parameters.
Step 3: Install the WordPress Blogging Platform
You will see tons of tools to manage your website on the dashboard. Click the website drop-down button on the left pane, select WordPress, and click install as you can see below.
WordPress is a Content Management System (CMS) that makes it easy to manage critical aspects of your website – without needing to know anything about programming. Choose from hundreds of beautiful designs and customize them for your business site, blog, or portfolio.
On the next page, fill in all the required information, such as the title of your blog (you can change it later), your username and the password you will use to manage your website.

Also, click on advance and make your domain protocol is https:// and not http://. Ensuring the protocol is https:// is essential to avoid mixed content issues later.
Make sure apart from the domain protocol highlighted above; you should refrain from touching anything in the advanced section. Click on Next to continue. On the next page, leave everything in default and click on install.

Now the system will install WordPress automatically. Once the installation is complete, click the “Edit Website” button on the right to log in to your blog administrator area.

As soon as you see a similar image like the one above, congratulations, you have successfully installed WordPress. Now it is time to customize your WordPress.
Blog Theme – Changing your blog design
Once you are on the WordPress dashboard, you can access many modules and tools. To begin with, open a new browser tab and enter your domain name; you will be greeted with the default WordPress theme. At the time of writing this blog, the default theme was twenty-twenty-three (2023), running on WordPress 6.1.1.

As you can see, the appearance is below par, so we will change the theme to make your website look professional. To change your theme, go to Appearance -> Themes -> Add New. Hover over the theme you want and click Install.
Once the installation is complete, Activate it. To see your new theme in action, open another tab, enter the domain name assigned to your blog and take a look!

One of those things I like about WordPress is its collection of over 2,000 free themes for your blog or other websites. Aside from the free themes, premium options are also available in the WordPress library and third-party sources like ThemeForest.
What are WordPress premium themes?
You may be wondering why people opted for a premium theme. Well, with premium themes, you can anticipate access to reliable support, frequent updates, and premium plugins usually bundled with your purchase.
While free WordPress themes might be enough for some successful blogs, they typically include little to no support, making premium themes worth the investment.
If you will opt for a premium theme for your blog, consider these essential factors:
- Pricing. If you’re eyeing a premium blog theme, make sure it is worth its price. Compare it to other similarly priced themes.
- Appropriate design. The design of the theme should fit the content of your blog. Always prioritize simple designs that elevate each blog post.
- Features. Check whether the theme you want includes features like a drag-and-drop builder, premade layouts, and customer support.
- Responsiveness. Use a responsive theme that’ll adapt to any screen size – over half of all website traffic comes from mobile devices.
- User reviews. Before getting a theme, read whether people have had a positive experience with it.
This blog runs on the JNews – WordPress Newspaper Magazine Blog AMP Theme. There are many responsive and professional multipurpose premium themes for those who wish to get premium and dedicated support.
As I said above, the success of your blog or online presence has nothing to do with whether you go for a premium or free theme. The quality of your content and determination are the keys to your blogging success.
Therefore, pick a popular theme (Free or Premium) with positive user ratings and extensive community support. I picked JNews – WordPress Newspaper Magazine Blog AMP Theme because I fell in love with the appearance (the tutorial pre-made template) and wanted my blog to be like that.
Pro Tip: If you have seen an awesome website and want to make yours look more or less the same, use this tool to find the WordPress theme they are using. You can then search for the theme and acquire it for your blog.
For this tutorial, I will use the free WordPress theme called ColorMag. ColorMag has both Free and Pro versions. We can still stick to the free version because it has everything we need for a successful blog. Search for ColorMag install and activate it or use any of the free themes available on your dashboard.

After installing and activating the theme, click on the “Getting Started with ColoMag” button. On the next page, select the layout that fancies you and click on import.
After the import is successful, visit your site again to see the all-new theme with menus, widgets and sample posts, pages and categories.

That is it; you have successfully changed your WordPress Theme and installed demo content. However, since we don’t need the demo contents, we can delete them but keep the layout. We will also do some page customization to make the blog more outstanding.
Customizing Your Blog Appearance
After installing WordPress and changing the default theme, it is time to customize the appearance and add a little touch to blog pages, posts, menus, and sidebars. Follow these steps to customize your blog.
1. Change the Website Permalinks
A permalink (short for “permanent link”) is a URL that remains unchanged and permanent over time. It links to a specific web page or piece of content that is unlikely to change so that the link can be referenced and used in the future without the risk of breaking. A permalink is often used to link to a blog post, article, or other content intended to be permanent and always available.

As you can see above, the permalink contains some weird characters and the publication date. But when you check this blog, you will only see the domain name and article title as the permalink. So let’s change yours!
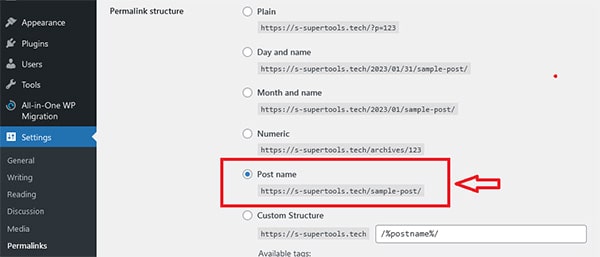
Now, on the administrators’ dashboard, go to settings, click on permalinks, select the “Post name” radio button, scroll down and click on “Save Changes“. Please return to your website, open one of the blogs and check the permalink. It’s quite pretty now; congratulations!

2. Customize the Site Logo, Site Icon, Site Title and Tagline
To start your blog, you must first customise a few things, especially adding your preferred logo and changing the website icon.
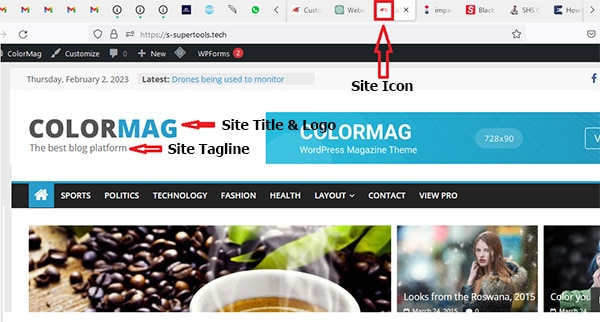
Website logo: The logo is typically placed at the top of every website page and serves as a visual identifier for visitors.
Site Icon: A site icon (also known as a “favicon”) is a small, square icon that appears in a browser’s address bar, bookmarks, and tabs. It represents the website and provides a visual cue for visitors to identify it quickly.
Site Title: The site title is a text description of the website typically displayed in the browser’s title bar or tab. It gives visitors an idea of what the website is about and also search engines to understand the content of a website.
Tagline: A tagline is a brief, memorable phrase or sentence that sums up a brand’s or website’s essence. It often appears beneath the site’s logo and conveys the brand’s message or purpose concisely and memorably.
To change your website logo, icon, title and tagline, kindly navigate to Appearance > Customize > Header > Site Identity. Use this link for details on how to change your website’s logo and icon.
3. Customize the Footer section, Copyright tag and Date
The ColorMag theme allows you to customize the various section of the footer bottom bar. Please note that the free version of ColorMag won’t allow you to customize some aspects of the footer.
The inability to customize some aspects of your website is one of the drawbacks of using free themes. However, you can still have a successful blog regardless.
To customize the footer navigate to Appearance > Customize > Footer>General. You can also click on customize directly from your blog homepage.
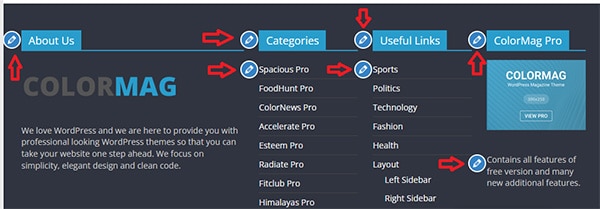
When you get to the customization page, scroll down to the footer section, then use the pencil icon to edit individual footer widgets.
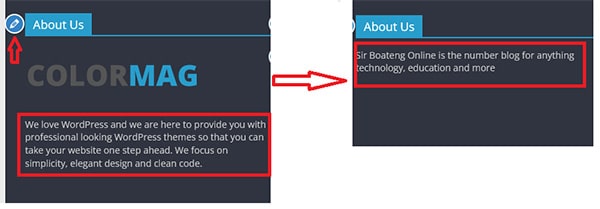
As you can see above, I have edited the About Us widget at the footer section to reflect my website description. Please refer to this page if you need to customize more, including the background color and typography.
4. Add Important Website Pages for Your Blog
Your blog should contain a few essential pages to give visitors information about you, your company, or the blog content. These pages are static, meaning their content doesn’t change, or at least not very often. These static content pages should be in place before you launch your blog.
These are the pages you should create and include in your menus before you start creating blogs:
- About Me (Or About Us if you have a team) – Tell your readers about yourself or your company, your mission, and your motivation.
- Contact Me (or Contact Us if you have a team) – A contact page gives the visitor a place to reach you. You can add your physical address, phone number, and email address on the contact page. It would be best if you also put links to all of your social media profiles on this page.
- Terms of Service Page – A terms of service (TOS) page for your blog is a legal document that sets out the rules and guidelines for people using the blog. The TOS aims to protect the blog owner’s interests and ensure that visitors use the blog appropriately and lawfully. Use https://www.freeprivacypolicy.com to generate your blog’s terms of service.
- Privacy Policy Page – A privacy policy page for your blog is a legal document that outlines how you collect, use, and share personal information from its visitors. A privacy policy declaration is necessary, especially if you show adverts on your blog. You can use https://www.freeprivacypolicy.com to generate a free privacy policy for your blog.
- Disclaimer page – A disclaimer on your blog is a statement explaining the site’s purpose and limitations. It tells visitors that the content on the site is only for information and that the website owner is not responsible for any mistakes. The page may also tell if the site makes money through advertising or if the content on the site belongs to the website owner. You can use https://www.disclaimergenerator.net to generate a free disclaimer for your blog.
How to add pages to your blog?
Some pages are added automatically right after installing a WordPress theme and importing content like what we did with the ColorMag theme. Mostly, Contact Us and Privacy Policy pages are added by default.
To add a new page to your WordPress blog, follow these steps:
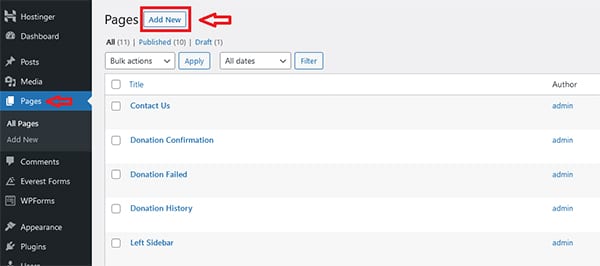
First, log in to your WordPress dashboard. Once in the WordPress dashboard, click on the “Pages” option in the left-side menu. Then click on the “Add New” button at the top of the page to create a new page.
Alternatively, since you are already logged in to your website, you can point your mouse at the “+ New” button at the top of your admin bar when you open your blog homepage. A list will drop down; please select “Page” from the list of options.
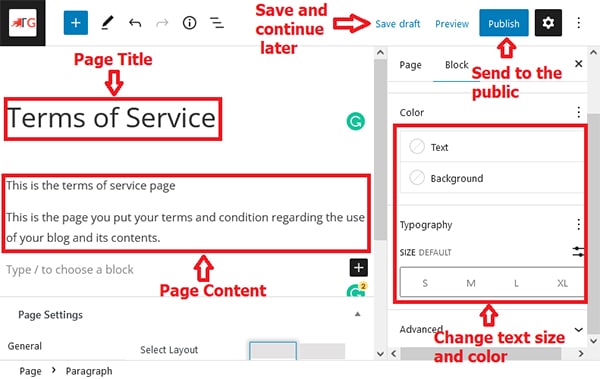
In the “Add New Page” window, enter a title for your new page in the “Enter title here” field. In the “Page Content” section, you can add text, images, videos, and other content to the page using the block editor.
Also, on the right side, there is an option to change the text size, text colour and background colour. Moreover, you can use the “Save draft” to save your work and continue later.
When you have finished adding content to the page, click on the “Publish” button in the right-side menu to make the page live on your website.
Finally, click on the “View Page” link in the “Page Published” notification or go to the URL directly to view the new page on your website.

That’s it! You’ve successfully added a new page to your WordPress blog. You can repeat these steps to add additional pages to your website as needed. Knowing how to add a page is a crucial part of how to start a blog.
Need help installing your blog? Get help here.
5. Adding Your First Blog Post – How To Start a Blog
Now, you are unstoppable; you have successfully acquired a domain, a hosting, installed WordPress, changed your WordPress theme, customized the head and footer and finally created a page.
You are 60 percent done with how to start a blog. It is time to add some useful content (blogs) to your website.
Creating a blog post in WordPress is a simple process that can be accomplished in a few easy steps. To create your first blog post, log in to your WordPress dashboard and navigate to the Posts section on the left-hand side of the screen. You will be greeted with the demo blog post imported by the theme.
Since we are learning to start a blog from scratch, you can delete all the blog posts. To do so, kindly select all the blog posts, click on the “Bulk Action” box, and select “Move to trash.”
To create a new post, click on the “Add New” button at the top of the screen.
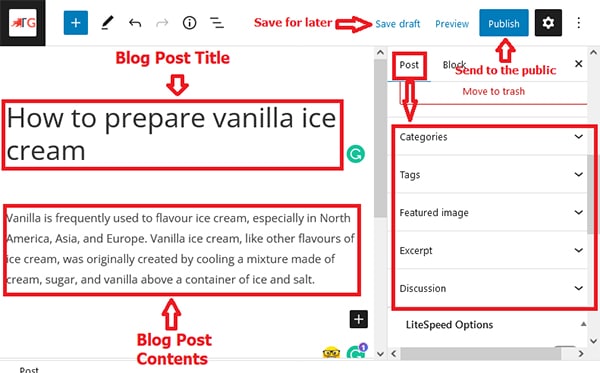
In the “Add New Post” screen (Also known as the WordPress text editor), enter a title for your blog post in the “Enter title here” field. Then, add your content to the text editor below. The text editor can format your content and add images, videos, and other media.
WordPress provides several post formats, such as Standard, Image, Gallery, Video, and others, at the right pane. You can choose the format that best suits the content you want to publish. Since we are learning how to start a blog, please choose standard or leave it as default.
Also, on the right side, there is an option to change the text size, text colour and background colour. Moreover, you can choose or create post categories and tags. You can also choose whether to allow comments or upload featured images. The featured image is what you want people to see when they search for your content or blog on Google Search.
Before you publish your post, you can preview it by clicking the “Preview” button. You can also save your article as a draft and edit it later.
When you’re ready to publish your post, click the “Publish” button on the right-hand side of the screen.
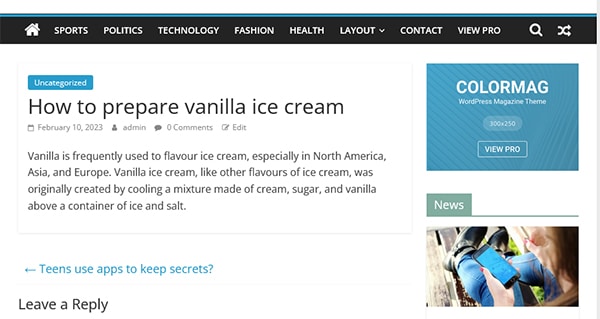
You’ve successfully added a new post to your WordPress blog; You are unstoppable! You can repeat these steps to add additional blog posts to your website as needed. You are no longer a newbie because you can start a blog.
6. Promote and Grow Your Blog Audience
Now that your new WordPress blog is running, you need people to read it. Even if you have high-quality content, it won’t matter if it doesn’t reach your target audience.
To get visitors to your blog, you must promote it, especially when you first start. The strategies below will help get your blog to reach more readers.
Create Great Content
The most important part of blog promotion is creating great content. Your content should be interesting, informative, and engaging. It should also be well-written and free of errors. To create great content, you need first to understand your audience.
Ask yourself these questions; What is my audience interested in? What would they like to learn more about?
Once you know your audience’s wants, you can create content that meets their needs. Remember, your content is the foundation of your blog. Without great content, you won’t be able to attract and retain readers. So take the time to create quality content that will help you grow your blog audience.
Need help installing your blog? Get help here.
Be Consistent When You Start the Blog
“One of the most important things you can do to promote and grow your blog audience is to be consistent. That means posting new content, engaging with your audience, and promoting your blog regularly.
If you can stick to a schedule and maintain a consistent presence, you’ll be well on your way to building a loyal following. Your readers will appreciate your efforts and be likelier to stick around (and tell their friends about you).
So how often should you be posting new content? That depends on your niche and audience, but a good rule of thumb is to aim for at least 2-3 times weekly.
And when it comes to promoting your blog, share each new post on social media and other platforms as soon as it goes live. The more people see your content, the more likely some will become regular readers.”
Use Multiple Platforms
Undoubtedly, social media is a powerful tool for promoting your blog and growing your audience. But it’s not the only platform you should use to reach new readers.
Using multiple platforms is essential to reach the widest possible audience. Here are some other platforms to promote your blog:
1. Email newsletters – This is a great way to keep in touch with your existing readers and let them know when you’ve published new content. You can also use email newsletters to promote your content to new readers.
2. Guest blogging – This involves writing articles for other blogs in your niche. It’s a great way to get your blog exposure and build relationships with other bloggers in your field.
3. Social bookmarking platforms – These sites allow users to share links to their favourite content. By submitting your blog posts to these sites, you can get more exposure and traffic from people interested in the same topics.
4. Forums – There are many online forums where people discuss various topics. Find forums that are relevant to your niche and participate in the discussions. You can include links to your blog posts in your forum signatures, which will help promote your content to a wider audience.
5. Paid advertising – This can effectively reach new readers, but you should use paid advertising sparingly to avoid overspending on marketing efforts. Try testing different ad networks and targeting options to see what works best for your blog and budget.
By using multiple platforms to promote your blog, you’ll be able to reach a larger audience and grow your reader base more quickly.
Engage With Your Audience
Engaging with your audience is one of the most important aspects of growing your blog. You must be active in the comments section, responding to questions and feedback.
You should also interact with other bloggers in your niche, guest posting on their blogs and sharing their content on social media. Engaging with your audience creates a community of loyal readers who will keep returning for more.
Optimize your blog for search engines.
If you want to attract more readers to your blog, it’s important to ensure it is optimized for search engines. You can do a few simple things to improve your blog’s ranking in search results, such as search engine optimization (SEO).
SEO (search engine optimization) is a great way to get your blog noticed. Many tools can help you optimize your blog for search engines, such as keyword research, link building, and content optimization tools.
To start your blog journey as a beginner, Yoast, Rank Maths, and All-in-one SEO are the greatest picks for on-page SEO. They will help you generate a sitemap and ensure your blog meta titles and descriptions are well-written.
It is also important to choose keywords carefully. When selecting keywords for your blog, consider what potential readers might be searching for. Try to use keywords that are specific and relevant to your topic. Using too many general keywords will make it difficult for people to find your blog.
Second, use keyword-rich titles and descriptions. When you are writing titles and descriptions for your blog posts, be sure to include relevant keywords. Including relevant keywords will help your blog appear in search results when people seek information on your topic.
Third, promote your blog. Be sure to let people know about your blog so they can read it! You can promote your blog by sharing links on social media, writing guest posts on other blogs, and submitting your blog to directories. Following these tips can improve your blog’s visibility and attract more readers.
Pro Tip: “To grow your blog audience, you must be strategic and consistent. Creating great content, using multiple platforms, and engaging with your audience are all key components to success. And don’t forget to optimize your blog for search engines so people can easily find your site. With a little hard work and dedication, you can build a large and loyal following for your blog.”
7. How to Make Money from Your Blog
Making money from your blog is the easiest part once you’ve developed and promoted great blog posts. Blogs have the potential to be incredibly profitable but don’t expect to start making money in the first week or even the first month after you start your blog.
Seeing a consistent stream of money may take some time. Blogging requires time and effort, but once you have a large enough readership, there are various ways to monetize your blog.
Sell advertising space
If you want to make money from your blog, selling advertising space is one of the simplest ways. You can place advertisements in several ways, such as through banner ads, text links, or sponsored posts.
Banner ads are the most common form of advertising on blogs. These are simply graphical ads displayed in a designated space on your blog. Readers who click on the ad will be taken to the advertiser’s website. Advertising companies such as google Adsense sell Banner ads on a CPM basis, which means you’ll get paid for every 1,000 impressions of the ad.
Text links are another common form of advertising on blogs. These are text-based links displayed in a designated space on your blog. Readers will be taken to the advertiser’s website when they click the link. Advertisers sell Text links on a CPC basis, which means you’ll get paid for every click the link receives.
Sponsored posts are posts that are specifically written for an advertiser. These posts can be about anything the advertiser wants but must be marked as sponsored content. Publishers sell sponsored posts on a CPM basis, which means you’ll get paid for every 1,000 impressions of the post.
Sell affiliate products
Another profitable way to make money from your blog is by selling affiliate products. By finding and promoting products relevant to your niche, you can earn a commission on every sale you make. This blog post, Samsung Galaxy S23 Ultra 5G: All You Need to Know, has an affiliate link to the Amazon website. I earn a commission when readers follow this link to purchase the phone.
In an affiliate program, you start your blog first, then sign up on an affiliate website, obtain a unique product or service link, and promote the products on your blog. You get paid whenever a reader purchase or subscribes to a service through your blog.
There are a few great affiliate networks that you can join, such as Commission Junction or ShareASale. These networks provide access to thousands of different affiliate programs, so you’re sure to find something that fits your blog well.
Sell Products and Services
Selling products and services is also a great way to make money from your blog. If you have a product or service you think people would like, you can sell it on your blog.
You can use various methods to sell products and services on your blog, such as using an online store, setting up a PayPal account, or using a third-party service like Shopify and Amazon.
Sell digital downloads on your blog
When your blog receives a lot of traffic, you can make money by selling digital downloads. You can sell e-books, music, software, or other digital products. An e-book is easier to write if you are exceptionally proficient in your niche. You’ll only need to set up a payment system so people can buy your products without visiting your physical store.
Sell memberships
Another way to earn money on your blog is to sell memberships. Membership subscriptions will give people exclusive content they can’t get anywhere else. You can also offer discounts on products and services to only members.
Pro Tip: “When you start your blog, there are many ways to make money from it. You can sell advertising space, affiliate products, digital downloads, and memberships. To get the most out of blogging, try several methods of earning and choose the one that best suits your needs.”
Wrapping Up
Starting a blog and earning money online can be a great way to make some extra income. With the right motivation and dedication, anyone can make a successful blog and start earning money. It’s important to remember that any business venture has no guarantees of success.
However, if you’re willing to work hard, you can start a successful blog that will generate income. So, why not give it a try? You could be the next blogging success story.
Need Help to start your blog?
I hope this step-by-step guide has answered any questions you had on how to start a blog, but if you run into some problems or want personalized help and advice, please do not hesitate to contact me anytime. Blogging, technology, and teaching are my passion, and I would love to talk with you about them!





Comments 1